How to mount exfat in kali or ubuntu/debian like distribution, one solution occurred in many posts is like below,
apt-get install python-software-properties
add-apt-repository ppa:relan/exfat
apt-get update
apt-get install fuse-exfat
mount -t exfat /dev/sdc1 /media/exfat
but it doesn't work for me.
The other solution listed below works for me ,
apt-get install libfuse-dev # for fuse.h
download fuse-exfat from http://code.google.com/p/exfat/
follow instructions in http://code.google.com/p/exfat/wiki/HOWTO
scons
scons install
mount.exfat-fuse /dev/sdXn /mnt/exfat
Thursday, December 26, 2013

Wednesday, December 25, 2013
my new kali source.list
My Kali repository mirror is referred to http://mirror.hust.edu.cn, but somehow, it is slow for me to do apt-get update and dist-upgrade. So I wanna to manually change the mirror site. According to instructions in http://www.blackmoreops.com/2013/11/14/change-repositories-different-mirror/, I currently change my mirror to http://mirrors.neusoft.edu.cn/ instead.
So my source.list is listed below,
for kali 1
#
# deb cdrom:[Debian GNU/Linux 7.0 _Kali_ - Official Snapshot i386 LIVE/INSTALL Binary 20130905-08:50]/ kali contrib main non-free
#deb cdrom:[Debian GNU/Linux 7.0 _Kali_ - Official Snapshot i386 LIVE/INSTALL Binary 20130905-08:50]/ kali contrib main non-free
#deb http://http.kali.org/kali kali main non-free contrib
#deb-src http://http.kali.org/kali kali main non-free contrib
#deb http://mirrors.neusoft.edu.cn/kali kali main non-free contrib
#deb-src http://mirrors.neusoft.edu.cn//kali kali main non-free contrib
#deb http://archive-4.kali.org/kali kali main non-free contrib
#deb-src http://archive-4.kali.org/kali kali main non-free contrib
deb http://kali.cs.nctu.edu.tw/kali kali main non-free contrib
deb-src http://kali.cs.nctu.edu.tw/kali kali main non-free contrib
## Security updates
#deb http://security.kali.org/kali-security kali/updates main contrib non-free
#deb http://mirrors.neusoft.edu.cn/kali-security kali/updates main contrib non-free
deb http://kali.cs.nctu.edu.tw/kali-security kali/updates main contrib non-free
#deb http://ftp.halifax.rwth-aachen.de/kali-security kali/updates main contrib non-free
#deb http://archive-4.kali.org/kali-securinty kali/updates main contrib non-free
for kali2
# Regular repositories
deb http://http.kali.org/kali sana main non-free contrib
deb http://security.kali.org/kali-security sana/updates main contrib non-free
# Source repositories
deb-src http://http.kali.org/kali sana main non-free contrib
deb-src http://security.kali.org/kali-security sana/updates main contrib non-free
Reference
http://www.blackmoreops.com/2015/08/13/how-to-add-official-kali-linux-repositories/
So my source.list is listed below,
for kali 1
#
# deb cdrom:[Debian GNU/Linux 7.0 _Kali_ - Official Snapshot i386 LIVE/INSTALL Binary 20130905-08:50]/ kali contrib main non-free
#deb cdrom:[Debian GNU/Linux 7.0 _Kali_ - Official Snapshot i386 LIVE/INSTALL Binary 20130905-08:50]/ kali contrib main non-free
#deb http://http.kali.org/kali kali main non-free contrib
#deb-src http://http.kali.org/kali kali main non-free contrib
#deb http://mirrors.neusoft.edu.cn/kali kali main non-free contrib
#deb-src http://mirrors.neusoft.edu.cn//kali kali main non-free contrib
#deb http://archive-4.kali.org/kali kali main non-free contrib
#deb-src http://archive-4.kali.org/kali kali main non-free contrib
deb http://kali.cs.nctu.edu.tw/kali kali main non-free contrib
deb-src http://kali.cs.nctu.edu.tw/kali kali main non-free contrib
#deb http://security.kali.org/kali-security kali/updates main contrib non-free
#deb http://mirrors.neusoft.edu.cn/kali-security kali/updates main contrib non-free
deb http://kali.cs.nctu.edu.tw/kali-security kali/updates main contrib non-free
#deb http://ftp.halifax.rwth-aachen.de/kali-security kali/updates main contrib non-free
#deb http://archive-4.kali.org/kali-securinty kali/updates main contrib non-free
for kali2
# Regular repositories
deb http://http.kali.org/kali sana main non-free contrib
deb http://security.kali.org/kali-security sana/updates main contrib non-free
# Source repositories
deb-src http://http.kali.org/kali sana main non-free contrib
deb-src http://security.kali.org/kali-security sana/updates main contrib non-free
Reference
http://www.blackmoreops.com/2015/08/13/how-to-add-official-kali-linux-repositories/
Thursday, December 05, 2013
zeroconf
In ubuntu or debian like distribution,
apt-get install avahi-daemon avahi-discover libnss-mdns
Try avahi-discover to discover nearby zeroconf machine.
Then check /etc/hostname content, for example mine is kali-j2c
Others can ping kali-j2c.local to reach this device.
Troubleshooting 1:
If the error "avahi-daemon disabled because there is a unicast .local domain" occurred, try to update /etc/default/avahi-daemon to make sure
Solution:
AVAHI_DAEMON_DETECT_LOCAL=0
Troubleshooting 2:
$update-rc.d avahi-daemon defaults
update-rc.d: using dependency based boot sequencing
insserv: warning: current start runlevel(s) (empty) of script `avahi-daemon' overrides LSB defaults (2 3 4 5).
insserv: warning: current stop runlevel(s) (0 1 2 3 4 5 6) of script `avahi-daemon' overrides LSB defaults (0 1 6).
Solution:
$update-rc.d avahi-daemon remove
$update-rc.d avahi-daemon defaults
Reference:
https://help.ubuntu.com/community/HowToZeroconf
http://www.jackenhack.com/raspberry-pi-avahi-daemon-disabled-because-there-is-a-unicast-local-domain-solved/
http://www.blackmoreops.com/2014/06/19/kali-linux-remote-ssh/
apt-get install avahi-daemon avahi-discover libnss-mdns
Try avahi-discover to discover nearby zeroconf machine.
Then check /etc/hostname content, for example mine is kali-j2c
Others can ping kali-j2c.local to reach this device.
Troubleshooting 1:
If the error "avahi-daemon disabled because there is a unicast .local domain" occurred, try to update /etc/default/avahi-daemon to make sure
Solution:
AVAHI_DAEMON_DETECT_LOCAL=0
Troubleshooting 2:
$update-rc.d avahi-daemon defaults
update-rc.d: using dependency based boot sequencing
insserv: warning: current start runlevel(s) (empty) of script `avahi-daemon' overrides LSB defaults (2 3 4 5).
insserv: warning: current stop runlevel(s) (0 1 2 3 4 5 6) of script `avahi-daemon' overrides LSB defaults (0 1 6).
Solution:
$update-rc.d avahi-daemon remove
$update-rc.d avahi-daemon defaults
Reference:
https://help.ubuntu.com/community/HowToZeroconf
http://www.jackenhack.com/raspberry-pi-avahi-daemon-disabled-because-there-is-a-unicast-local-domain-solved/
http://www.blackmoreops.com/2014/06/19/kali-linux-remote-ssh/
Thursday, May 30, 2013
libxml2 - process node in the tree.
Because the original code example which libxml2 demo tree1.c how to traverse the tree was using Recursive to process the relationship between the children node and the next node, but I think it is dangerous because we don't know when the stack overflow problem happen and it will happen sometime in the future.
the original code example
So I checked the xmlNode structure and find out the parent node is the useful hint to traverse the xml node tree.
{
for (; indent; --indent) {
putchar(' ');
putchar(' ');
}
}
int getNextNode( xmlNode **pCurr, int *deepth )
{
xmlNode *curr = *pCurr;
if ( curr->children!=NULL ) {
/* Move to the children node.
*/
curr = curr->children;
*deepth += 1;
} else if ( curr->next==NULL && curr->parent) {
/* Go back to the parent node.
then go to the next node of the parent node or
go to the parent node of the parent node if there is no any next node behind.
if there is no any parent node, it should be the XML_DOCUMENT_NODE.
*/
curr = curr->parent;
*deepth -= 1;
while ( curr->next==NULL && curr->parent!=NULL ) {
curr = curr->parent;
*deepth -= 1;
}
if ( curr->next!=NULL ) {
curr = curr->next;
} else {
/* It should be XML_DOCUMENT_NODE.
*/
curr = NULL;
}
} else {
curr = curr->next;
}
*pCurr = curr;
}
void process_node(xmlNode *pNode)
{
xmlNode *curr=NULL;
int indent=0;
if ( !pNode ) {
printf("No Node exist\n");
return;
}
for ( curr=pNode ; curr ; getNextNode(&curr, &indent)) {
if (curr->type == XML_ELEMENT_NODE) {
do_indent(indent);
printf("node type: Element, name: %s", curr->name);
if ( curr->properties ) {
process_attr(curr->properties);
}
printf("\n");
} else if ( curr->type==XML_TEXT_NODE ) {
do_indent(indent);
printf("node type: Text, name: %s\n", curr->content);
}
}
}
the original code example
static void print_element_names(xmlNode * a_node){ xmlNode *cur_node = NULL;
for (cur_node = a_node; cur_node; cur_node = cur_node->next) { if (cur_node->type == XML_ELEMENT_NODE) { printf("node type: Element, name: %s\n", cur_node->name); } print_element_names(cur_node->children); }}
So I checked the xmlNode structure and find out the parent node is the useful hint to traverse the xml node tree.
- Process the current node first.
- Check the node if there is any children node and yes, process the children node.
- Check the node if there is any next node and yes, process the next node.
- If there is no children and next node,
- check if there is any parent node and yes, go back to the parent node
- When in the parent node, because it should be processed in step 0, check if there is any next node.
- If there is a next node, repeat step 3.
- If there is no any next node, repeat step 4.
- Finally there is no next and parent node, the node should be the XML_DOCUMENT_NODE.
{
for (; indent; --indent) {
putchar(' ');
putchar(' ');
}
}
int getNextNode( xmlNode **pCurr, int *deepth )
{
xmlNode *curr = *pCurr;
if ( curr->children!=NULL ) {
/* Move to the children node.
*/
curr = curr->children;
*deepth += 1;
} else if ( curr->next==NULL && curr->parent) {
/* Go back to the parent node.
then go to the next node of the parent node or
go to the parent node of the parent node if there is no any next node behind.
if there is no any parent node, it should be the XML_DOCUMENT_NODE.
*/
curr = curr->parent;
*deepth -= 1;
while ( curr->next==NULL && curr->parent!=NULL ) {
curr = curr->parent;
*deepth -= 1;
}
if ( curr->next!=NULL ) {
curr = curr->next;
} else {
/* It should be XML_DOCUMENT_NODE.
*/
curr = NULL;
}
} else {
curr = curr->next;
}
*pCurr = curr;
}
void process_node(xmlNode *pNode)
{
xmlNode *curr=NULL;
int indent=0;
if ( !pNode ) {
printf("No Node exist\n");
return;
}
for ( curr=pNode ; curr ; getNextNode(&curr, &indent)) {
if (curr->type == XML_ELEMENT_NODE) {
do_indent(indent);
printf("node type: Element, name: %s", curr->name);
if ( curr->properties ) {
process_attr(curr->properties);
}
printf("\n");
} else if ( curr->type==XML_TEXT_NODE ) {
do_indent(indent);
printf("node type: Text, name: %s\n", curr->content);
}
}
}
Tuesday, May 28, 2013
perl - lwp implement
#!/usr/bin/env perl
use strict;
use LWP;
use File::Basename;
use warnings;
use constant false => 0;
use constant true => 1;
my $host = "192.168.1.1";
my $prot = "https://";
my ($user, $pwd) = ("admin", "1234");
my @pathes = qw(/status_quickview.cgi);
my $ua = LWP::UserAgent->new();
$ua->cookie_jar({ file => "$ENV{HOME}/.cookies.txt", autosave=>1 });
push @{ $ua->requests_redirectable}, 'POST';
$ua->show_progress(true);
if ( is_login()==false ) { do_login(); }
foreach my $p (@pathes) {
do_get($p);
}
do_logout();
sub do_post {
my ($path, $query) = @_;
print "do_post($path)\n";
my $url = $prot . $host . $path;
my $req = HTTP::Request->new(POST => $url);
$req->content_type('application/x-www-form-urlencoded');
$req->content($query);
# print $req->as_string(),"\n";
my $resp = $ua->request($req);
if ( $resp->is_error() ) {
print $resp->status_line(), "\n";
exit();
}
# print $resp->content, "\n"; return $resp;
}
sub do_get {
my ($fullpath) = @_;
my ($name, $path, $suffix) = fileparse($fullpath);
print "do_get($fullpath)\n";
my $url = $prot . $host . $fullpath;
my $req = HTTP::Request->new(GET => $url);
# my $resp = $ua->request($req, $name);
my $resp = $ua->request($req);
if ( $resp->is_error() ) {
print $resp->status_line(), "\n";
exit();
}
# print $resp->content(), "\n";
return $resp;
}
sub do_login {
print "do_login()\n";
my $path = "/login_handler.cgi";
my $query = sprintf("username=%s&password=%s&Signin=Login", $user, $pwd);
my $resp = do_post($path, $query);
if ( 1 and $resp->content=~m/type=(\w+)/ ) {
# print "type=$1\n";
$ua->cookie_jar->set_cookie(0, 'type', $1, '/', $host);
$ua->cookie_jar->save();
}
}
sub is_login {
print "is_login()\n";
my $path = "/status_quickview.cgi";
my $resp = do_get($path);
if ( index($resp->content, "login.cgi")!=-1 ) {
return false;
} else {
return true;
}
}
sub do_logout {
print "do_logout()\n";
my $path = "/tools_logout.cgi";
my $resp = do_post($path, "apply=");
# print $resp->content, "\n";
}
use strict;
use LWP;
use File::Basename;
use warnings;
use constant false => 0;
use constant true => 1;
my $host = "192.168.1.1";
my $prot = "https://";
my ($user, $pwd) = ("admin", "1234");
my @pathes = qw(/status_quickview.cgi);
my $ua = LWP::UserAgent->new();
$ua->cookie_jar({ file => "$ENV{HOME}/.cookies.txt", autosave=>1 });
push @{ $ua->requests_redirectable}, 'POST';
$ua->show_progress(true);
if ( is_login()==false ) { do_login(); }
foreach my $p (@pathes) {
do_get($p);
}
do_logout();
sub do_post {
my ($path, $query) = @_;
print "do_post($path)\n";
my $url = $prot . $host . $path;
my $req = HTTP::Request->new(POST => $url);
$req->content_type('application/x-www-form-urlencoded');
$req->content($query);
# print $req->as_string(),"\n";
my $resp = $ua->request($req);
if ( $resp->is_error() ) {
print $resp->status_line(), "\n";
exit();
}
# print $resp->content, "\n"; return $resp;
}
sub do_get {
my ($fullpath) = @_;
my ($name, $path, $suffix) = fileparse($fullpath);
print "do_get($fullpath)\n";
my $url = $prot . $host . $fullpath;
my $req = HTTP::Request->new(GET => $url);
# my $resp = $ua->request($req, $name);
my $resp = $ua->request($req);
if ( $resp->is_error() ) {
print $resp->status_line(), "\n";
exit();
}
# print $resp->content(), "\n";
return $resp;
}
sub do_login {
print "do_login()\n";
my $path = "/login_handler.cgi";
my $query = sprintf("username=%s&password=%s&Signin=Login", $user, $pwd);
my $resp = do_post($path, $query);
if ( 1 and $resp->content=~m/type=(\w+)/ ) {
# print "type=$1\n";
$ua->cookie_jar->set_cookie(0, 'type', $1, '/', $host);
$ua->cookie_jar->save();
}
}
sub is_login {
print "is_login()\n";
my $path = "/status_quickview.cgi";
my $resp = do_get($path);
if ( index($resp->content, "login.cgi")!=-1 ) {
return false;
} else {
return true;
}
}
sub do_logout {
print "do_logout()\n";
my $path = "/tools_logout.cgi";
my $resp = do_post($path, "apply=");
# print $resp->content, "\n";
}
C - Key/Value Pair Programming
/*

conf.txt
a=1
b=2
c=3
x=4
y=5
z=6

 */

#include <stdio.h>
#include <stdlib.h>
#include <string.h>

struct {
  char *a;
  int  b;
  char *c;
  int  x;
  char *y;
  int  z;
} conf;

struct config_t {
  char *key;
  enum {
    TYPE_STR,
    TYPE_INT,
  } value_type;
  union {
    char **str_var;
    int *int_var;
  };
}
config_table[] = {
  {"a",  TYPE_STR,  {.str_var=&conf.a} },
  {"b",  TYPE_INT,  {.int_var=&conf.b}},
  {"c",  TYPE_STR,  {.str_var=&conf.c}},
  {"x",  TYPE_INT,  {.int_var=&conf.x}},
  {"y",  TYPE_STR,  {.str_var=&conf.y}},
  {"z",  TYPE_INT,  {.int_var=&conf.z}},
  {NULL, TYPE_STR, {NULL} }
};

int main(int argc, char *argv[])
{
  char buf[80];
  FILE *fp;
  struct config_t *pConfig;
  char *k, *v, *found;

  fp=fopen("conf.txt", "r");
  if ( !fp ) {
    perror("fopen failed");
    exit(1);
  }

  while ( fgets(buf, sizeof(buf), fp)!=NULL ) {
    found=strchr(buf, '\n');
    if ( found ) {
      *found=0x00;
    }

    found = strchr(buf, '=');
    if ( !found ) {
      continue;
    }
    *found=0x00;
    k=buf;
    v=found+1;

    pConfig = config_table;
    for (; pConfig->key ; ++pConfig) {
      if ( strcmp(k, pConfig->key)==0 ) {
        if ( pConfig->value_type==TYPE_STR ) {
          *pConfig->str_var = strdup(v);
        } else if ( pConfig->value_type==TYPE_INT ) {
          *pConfig->int_var = atoi(v);
        }
      }
    }
  }

  printf("a:%s\nb:%d\nc:%s\n", conf.a, conf.b, conf.c);
  printf("x:%d\ny:%s\nz:%d\n", conf.x, conf.y, conf.z);

  return 0;
}
Sunday, May 26, 2013
Perl experience - misc
In Perl, when to call subroutine with ampersand or parentheses. It's always confusing to me. Finally, I have some conclusion on it.
1. if perl can see the subroutine definition before invocation, ampersand can be omitted.
2. if perl can tell from the syntax that it's a subroutine call, for example sub(), ampersand can be omitted.
3. Otherwise, use &. Or you will get compilation error when using strict.
Correct Example
1. if perl can see the subroutine definition before invocation, ampersand can be omitted.
2. if perl can tell from the syntax that it's a subroutine call, for example sub(), ampersand can be omitted.
3. Otherwise, use &. Or you will get compilation error when using strict.
Correct Example
#!/usr/bin/env perluse strict;use warnings;
&sub1;
## the parentheses tell it's subroutine.#sub1();
sub sub1
{
  print "sub1\n";
}
## the subroutine defintion before invocation.#sub1;#!/usr/bin/env perluse strict;use warnings;sub1;sub sub1
{
print "sub1\n";
}
Bareword "sub1" not allowed while "strict subs" in use at sub.pl
Simple circular buffer implement
circular implement
#include
#include
#define BUF_SIZE 4
typedef struct {
enum {
BUFF_STATUS_EMPTY=0,
BUFF_STATUS_NOTEMPTY,
BUFF_STATUS_FULL
} status;
int b[BUF_SIZE];
int i;
int o;
} buff_t ;
void in(buff_t *buf)
{
int newp;
do {
newp= (buf->i+1)%BUF_SIZE;
if ( newp == buf->o ) {
buf->status=BUFF_STATUS_FULL;
break;
} else {
buf->status=BUFF_STATUS_NOTEMPTY;
buf->i=newp;
buf->b[buf->i]=buf->i;
}
} while (1) ;
}
void out(buff_t *buf)
{
int newp;
do {
newp=(buf->o+1)%BUF_SIZE;
if ( newp==buf->i ) {
buf->status = BUFF_STATUS_EMPTY;
break;
} else {
buf->o=newp;
printf("%d:%d\n", buf->o, buf->b[buf->o]);
buf->b[newp]=0x00;
}
} while (1);
}
int main(int argc, char *argv)
{
buff_t b1;
memset(&b1, 0x00, sizeof(b1));
for (;1;) {
if ( b1.status != BUFF_STATUS_FULL)
in(&b1);
if (b1.status != BUFF_STATUS_EMPTY)
out(&b1);
}
}
#include
#include
#define BUF_SIZE 4
typedef struct {
enum {
BUFF_STATUS_EMPTY=0,
BUFF_STATUS_NOTEMPTY,
BUFF_STATUS_FULL
} status;
int b[BUF_SIZE];
int i;
int o;
} buff_t ;
void in(buff_t *buf)
{
int newp;
do {
newp= (buf->i+1)%BUF_SIZE;
if ( newp == buf->o ) {
buf->status=BUFF_STATUS_FULL;
break;
} else {
buf->status=BUFF_STATUS_NOTEMPTY;
buf->i=newp;
buf->b[buf->i]=buf->i;
}
} while (1) ;
}
void out(buff_t *buf)
{
int newp;
do {
newp=(buf->o+1)%BUF_SIZE;
if ( newp==buf->i ) {
buf->status = BUFF_STATUS_EMPTY;
break;
} else {
buf->o=newp;
printf("%d:%d\n", buf->o, buf->b[buf->o]);
buf->b[newp]=0x00;
}
} while (1);
}
int main(int argc, char *argv)
{
buff_t b1;
memset(&b1, 0x00, sizeof(b1));
for (;1;) {
if ( b1.status != BUFF_STATUS_FULL)
in(&b1);
if (b1.status != BUFF_STATUS_EMPTY)
out(&b1);
}
}
Stuff interested
List the stuff which I am interested.
Blackberry
C
C++
C#
Erlang
Java
Lua
Object C
Perl
Ubuntu
Blackberry
C
C++
C#
Erlang
Java
Lua
Object C
Perl
- perl experience - module installation
- perl - hash, array, reference
- perl experience - ssh installation
- perl experience - ssh implement
- Perl experience - misc
- perl - lwp implement
- perl - aes implement
- Foundations of Python Network Programming
- python - aes implement
Ubuntu
Wednesday, March 20, 2013
透過 http 存取 svn repository
記錄如何透過 http 存取 svn repository
以 bt5r3 為例
Troubleshoot,
If "permission denies" occurred, try
chown -R www-data:www-data _the_svn_repository_directory_
以 bt5r3 為例
- apache 設定檔位置在 /etc/apache2
- mod_dav_svn.so
- 如果沒有 mod_dav_svn.so, 所以安裝 apt-get install libapache2-mod-python libapache2-svn, 安裝完後, 會產生 mod-avaiable/dav_svn.load, mod-available/dav_svn.conf, mod-enable/dav_svn.load, mod-enable/dav_svn.conf
- 編輯 mod-availble/dav_svn.conf
<Location>
DAV svn
SVNParentPath /var/svn
AuthType Basic
AuthName "Subversion Repository"
AuthUserFile /etc/apache2/dav_svn.passwd
AuthzSVNAccessFile /etc/apache2/dav_svn.authz
Require valid-user
</Location>
- 編輯 dav_svn.passwd
htpasswd -cm /etc/apache2/dav_svn.passwd ${username}
- 編輯 dav_svn.authz
[groups]
[/]
${username} = rw
- /etc/init.d/apache restart
Troubleshoot,
If "permission denies" occurred, try
chown -R www-data:www-data _the_svn_repository_directory_
Tuesday, February 19, 2013
boot from PXE
- pxe client 選擇 pxe 開機, 透過 dhcp 取得本身 IP 與 某個 file, 這個 file 也就是 pxe server 希望 pxe client 拿到 IP 之後, 再向 pxe server 透過 tftp 下載這個 file, 一般為 pxelinux.0
- pxe client 拿到 pxelinux.0 之後, 會嘗試下載本身 ether mac address 相關的檔案, 直到 pxelinux.cfg/default
- pxe server 可以透過 pxelinux.cfg/default, 提供開機選單訊息
- 此次實驗, pxe server 希望 pxe client 透過 nfs 掛載 bt5r3
Take bt5r3 as the pxe server
1. apt-get install dhcp3-server
/etc/dhcp3/dhcpd.conf
subnet 192.168.0.0 netmask 255.255.255.0 {
range 192.168.0.100 192.168.0.200;
filename "pxelinux.0";
}
設定本身 ip 為 192.168.0.100
/etc/init.d/dhcp3-sever restart
2. apt-get install tftpd-hpa
3. apt-get install nfs-kernel-server
/etc/export
/tftpboot *(rw,sync,no_subtree_check,no_root_squash,insecure)
/tftpboot/bt5r3 *(sync,insecure,no_root_squash,ro,no_subtree_check)
portmap
/etc/init.d/nfs-kernel-server restart
4. apt-get install syslinux
取得 pxelinux.0 執行檔
mount -t iso9660 -o loop bt5r3.iso /mnt
mkdir -p /tftpboot/bt5r3
cp -r /mnt/* /tftpboot/bt5r3
/tftpboot/pxelinux.0
cp /usr/lib/syslinux/pxelinux.0 /tftpboot/
/tftpboot/isolinux.msg
type bt5r3 to boot Backtrack 5 R3.
/tftpboot/pxelinux.cfg/default
TIMEOUT 100
DEFAULT bt5r3
PROMPT 1
DISPLAY /isolinux.msg
LABEL bt4
KERNEL bt5r3/casper/vmlinuz
APPEND initrd=bt5r3/casper/initrd.gz BOOT=casper boot=casper nopersistent rw quiet vga=0x317 netboot=nfs nfsroot=192.168.0.100:/tftpboot/bt5r3
參考資料
- http://www.backtrack-linux.org/forums/showthread.php?t=1470
- https://help.ubuntu.com/community/PXEInstallServer
Sunday, December 16, 2012
perl experience - ssh implement
my @key = ("/root/.ssh/id_rsa");
my $ssh = Net::SSH::Perl->new($host,
identity_files=>\@key,
# debug => 1
);
$ssh->login('root');
my $ssh = Net::SSH::Perl->new($host,
identity_files=>\@key,
# debug => 1
);
$ssh->login('root');
Thursday, June 14, 2012
samba in ubuntu
介紹如何在 ubuntu 上架 samba
1) 先安裝 samba
> sudo apt-get install samba
2) 改 /etc/samba/smb.conf, 加入想要分享的資料夾
[sda1]
path=/tmp/sda1
browseable = yes
read only = no
;writable = yes
;guest ok = yes
create mask = 0755
directory mask = 0755
[sda5]
path=/tmp/sda5
browseable = yes
read only = no
;writable = yes
;guest ok = yes
create mask = 0755
directory mask = 0755
[sda6]
path=/tmp/sda6
browseable = yes
read only = no
;writable = yes
;guest ok = yes
create mask = 0755
directory mask = 0755
[sdb1]
path=/tmp/sdb1
browseable = yes
read only = no
;writable = yes
;guest ok = yes
create mask = 0755
directory mask = 0755
[sdb2]
path=/tmp/sdb2
browseable = yes
read only = no
;writable = yes
;guest ok = yes
create mask = 0755
directory mask = 0755
1) 先安裝 samba
> sudo apt-get install samba
2) 改 /etc/samba/smb.conf, 加入想要分享的資料夾
[sda1]
path=/tmp/sda1
browseable = yes
read only = no
;writable = yes
;guest ok = yes
create mask = 0755
directory mask = 0755
[sda5]
path=/tmp/sda5
browseable = yes
read only = no
;writable = yes
;guest ok = yes
create mask = 0755
directory mask = 0755
[sda6]
path=/tmp/sda6
browseable = yes
read only = no
;writable = yes
;guest ok = yes
create mask = 0755
directory mask = 0755
[sdb1]
path=/tmp/sdb1
browseable = yes
read only = no
;writable = yes
;guest ok = yes
create mask = 0755
directory mask = 0755
[sdb2]
path=/tmp/sdb2
browseable = yes
read only = no
;writable = yes
;guest ok = yes
create mask = 0755
directory mask = 0755
3) 加入使用者帳號, 前提該帳號必須已經存在
smbpasswd -a some_user_account
mount in ubuntu
在 ubuntu 上, mount fat32 與 ntfs 的磁碟
1) 首先, 先看目前已經找到的磁碟區, 透過
>fdisk -l
Disk /dev/sda: 80.0 GB, 80026361856 bytes
255 heads, 63 sectors/track, 9729 cylinders
Units = cylinders of 16065 * 512 = 8225280 bytes
Sector size (logical/physical): 512 bytes / 512 bytes
I/O size (minimum/optimal): 512 bytes / 512 bytes
Disk identifier: 0xc05fc05f
Device Boot Start End Blocks Id System
/dev/sda1 * 1 2550 20482843+ 7 HPFS/NTFS
/dev/sda2 2551 9728 57657285 f W95 Ext'd (LBA)
/dev/sda5 2551 6374 30716248+ b W95 FAT32
/dev/sda6 6375 9728 26940973+ b W95 FAT32
Disk /dev/sdb: 80.0 GB, 80026361856 bytes
255 heads, 63 sectors/track, 9729 cylinders
Units = cylinders of 16065 * 512 = 8225280 bytes
Sector size (logical/physical): 512 bytes / 512 bytes
I/O size (minimum/optimal): 512 bytes / 512 bytes
Disk identifier: 0x2527a2c7
Device Boot Start End Blocks Id System
/dev/sdb1 1 3916 31455238+ 7 HPFS/NTFS
/dev/sdb2 3917 9729 46692922+ 7 HPFS/NTFS
2) mount 磁碟區
mkdir /tmp/sda1 /tmp/sda5 /tmp/sda6 /tmp/sdb1 /tmp/sdb2
mount -t ntfs-3g /dev/sda1 /tmp/sda1
mount -t vfat -o iocharset=utf8 /dev/sda5 /tmp/sda5
mount -t vfat -o iocharset=utf8 /dev/sda6 /tmp/sda6
mount -t ntfs-3g /dev/sdb1 /tmp/sdb1
mount -t ntfs-3g /dev/sdb2 /tmp/sdb2
其中,
mount as ntfs, 在 ubuntu 或 samba, 閱讀中文沒有問題
mount as vfat, 必須指定 iocharset=utf8, 在 ubuntu 或 samba, 才能閱讀中文
1) 首先, 先看目前已經找到的磁碟區, 透過
>fdisk -l
Disk /dev/sda: 80.0 GB, 80026361856 bytes
255 heads, 63 sectors/track, 9729 cylinders
Units = cylinders of 16065 * 512 = 8225280 bytes
Sector size (logical/physical): 512 bytes / 512 bytes
I/O size (minimum/optimal): 512 bytes / 512 bytes
Disk identifier: 0xc05fc05f
Device Boot Start End Blocks Id System
/dev/sda1 * 1 2550 20482843+ 7 HPFS/NTFS
/dev/sda2 2551 9728 57657285 f W95 Ext'd (LBA)
/dev/sda5 2551 6374 30716248+ b W95 FAT32
/dev/sda6 6375 9728 26940973+ b W95 FAT32
Disk /dev/sdb: 80.0 GB, 80026361856 bytes
255 heads, 63 sectors/track, 9729 cylinders
Units = cylinders of 16065 * 512 = 8225280 bytes
Sector size (logical/physical): 512 bytes / 512 bytes
I/O size (minimum/optimal): 512 bytes / 512 bytes
Disk identifier: 0x2527a2c7
Device Boot Start End Blocks Id System
/dev/sdb1 1 3916 31455238+ 7 HPFS/NTFS
/dev/sdb2 3917 9729 46692922+ 7 HPFS/NTFS
2) mount 磁碟區
mkdir /tmp/sda1 /tmp/sda5 /tmp/sda6 /tmp/sdb1 /tmp/sdb2
mount -t ntfs-3g /dev/sda1 /tmp/sda1
mount -t vfat -o iocharset=utf8 /dev/sda5 /tmp/sda5
mount -t vfat -o iocharset=utf8 /dev/sda6 /tmp/sda6
mount -t ntfs-3g /dev/sdb1 /tmp/sdb1
mount -t ntfs-3g /dev/sdb2 /tmp/sdb2
其中,
mount as ntfs, 在 ubuntu 或 samba, 閱讀中文沒有問題
mount as vfat, 必須指定 iocharset=utf8, 在 ubuntu 或 samba, 才能閱讀中文
Tuesday, February 28, 2012


Monday, February 27, 2012
Wireless Packet Howto
介紹Windows環境下, 如何架設環境
1) Wireless Adapter, 如 Edimax EW-7711UAn
2) Omnipeek driver, 以 Ralink Wireless Adapter 為例, 可以到 http://www.ralinktech.com/en/04_support/support.php?sn=500 (提供 1.4.0.16)

或 http://www.wildpackets.com/support/omni/omnipeek_basic/wireless (提供 1.4.0.18 for Windows 32/64 )

3) 安裝 driver


4) 執行 Omnipeek, 就可以開始抓取空氣中Wireless Packet
1) Wireless Adapter, 如 Edimax EW-7711UAn
2) Omnipeek driver, 以 Ralink Wireless Adapter 為例, 可以到 http://www.ralinktech.com/en/04_support/support.php?sn=500 (提供 1.4.0.16)
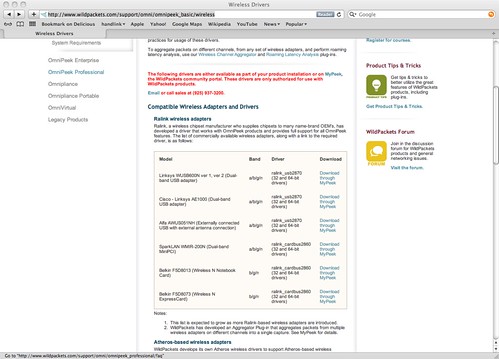
或 http://www.wildpackets.com/support/omni/omnipeek_basic/wireless (提供 1.4.0.18 for Windows 32/64 )
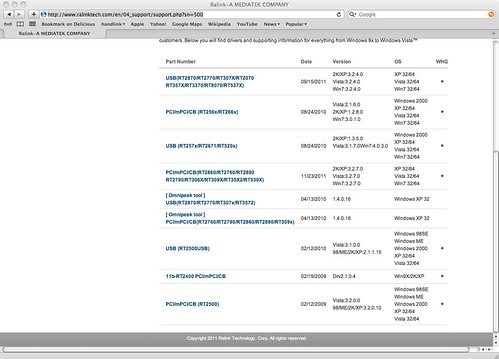
3) 安裝 driver
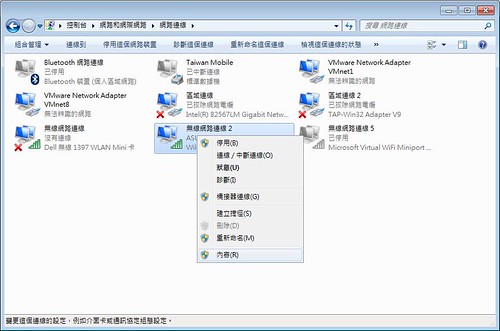
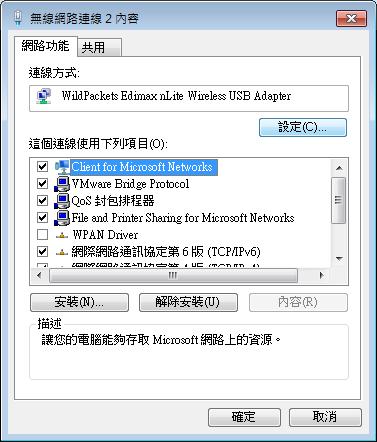
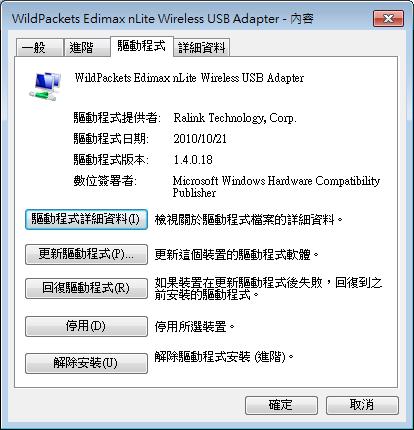
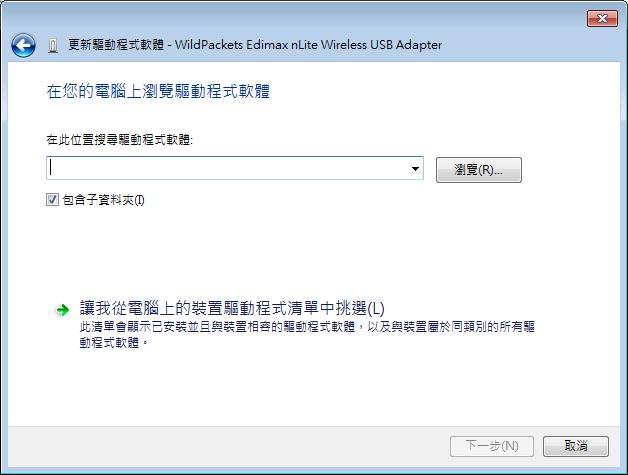
4) 執行 Omnipeek, 就可以開始抓取空氣中Wireless Packet
DD-WRT
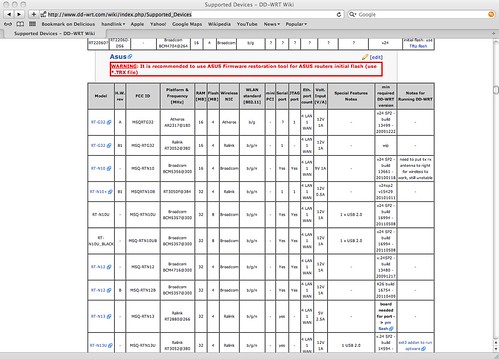
手上有台機器 RT3050 / 4M Flash / 32M RAM, 改成 DD-WRT
1) 先在 http://www.dd-wrt.com/wiki/index.php/Supported_Devices 找相同規格的型號(Model)與製造商(Manufacturer)

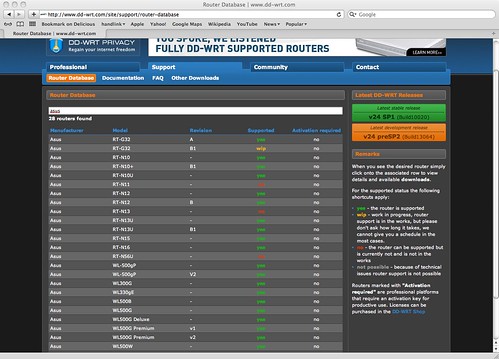
2) 再到 http://www.dd-wrt.com/site/support/router-database 打入該製造商(Manufacturer), 然後點選該型號(Model)

3) 之後開始下載 Firmware


4) 接下來, 接 RS-232 Console, 進 Uboot bootloader, 進行 tftp firmware upgrade
一開始找到D-Link DIR-300這個型號, 不過燒錄了相對應的Firmware, 結果無法開機。接著找到 Asus RT-N10+, 有2個firmware, factory-to-ddwrt.trx 與 asus-rt-n10plus-ddwrt-webflash.bin
在 Uboot 下, 用 tftp 燒錄 factory-to-ddwrt.trx, 完成後, 可以開機
之後進 Webui, 可以用 asus-rt-n10plus-ddwrt-webflash.bin 做 firmware upgrade
Friday, April 29, 2011
apache2與svn版本 conflict
內建的apache2 與 macport build的 svn 版本相衝的問題記錄
[Thu Apr 28 23:52:36 2011] [error] [client ::1] (20014)Internal error: Expected FS format '2'; found format '4', referer: https://localhost/svn/
[Thu Apr 28 23:52:36 2011] [error] [client ::1] Could not fetch resource information. [500, #0], referer: https://localhost/svn/
[Thu Apr 28 23:52:36 2011] [error] [client ::1] Could not open the requested SVN filesystem [500, #160043], referer: https://localhost/svn/
[Thu Apr 28 23:52:36 2011] [error] [client ::1] Could not open the requested SVN filesystem [500, #160043], referer: https://localhost/svn/
[Thu Apr 28 23:52:36 2011] [error] [client ::1] File does not exist: /Library/WebServer/Documents/favicon.ico, referer: https://localhost/svn/wap/
10.5.8 built-in apache2 參考的 /usr/bin/svn 1.4.4
但 /var/svn 是用 /opt/local/bin/svnadmin 1.6.16 建立出來的
Apr 29 06:10:39 pbg4-17 org.apache.httpd[65275]: httpd: Syntax error on line 485 of /private/etc/apache2/httpd.conf: Syntax error on line 3 of /private/etc/apache2/extra/httpd-subversion.conf: Cannot load /usr/libexec/apache2/mod_dav_svn_1.6.16.so into server: dlopen(/usr/libexec/apache2/mod_dav_svn_1.6.16.so, 10): Library not loaded: /usr/local/lib/libsvn_fs_base-1.0.dylib\n Referenced from: /usr/libexec/apache2/mod_dav_svn_1.6.16.so\n Reason: image not found
就算重build一個 mod_dav_svn_1.6.16.so, 也是沒有辦法
看起來是 apache2 參考到的 /usr/local/lib/libsvn_fs_base-1.0.dylib
沒有辦法打開這個 so
所以目前的方式是重新用 /usrbin/svnadmin 建立 repository
下一步可能考慮重新build apache2 2.2.17 and svn 1.6.16
[Fri Apr 29 06:17:43 2011] [notice] Apache/2.2.17 (Unix) mod_ssl/2.2.17 OpenSSL/0.9.7l DAV/2 SVN/1.4.4 configured -- resuming normal operations
[Thu Apr 28 23:52:36 2011] [error] [client ::1] (20014)Internal error: Expected FS format '2'; found format '4', referer: https://localhost/svn/
[Thu Apr 28 23:52:36 2011] [error] [client ::1] Could not fetch resource information. [500, #0], referer: https://localhost/svn/
[Thu Apr 28 23:52:36 2011] [error] [client ::1] Could not open the requested SVN filesystem [500, #160043], referer: https://localhost/svn/
[Thu Apr 28 23:52:36 2011] [error] [client ::1] Could not open the requested SVN filesystem [500, #160043], referer: https://localhost/svn/
[Thu Apr 28 23:52:36 2011] [error] [client ::1] File does not exist: /Library/WebServer/Documents/favicon.ico, referer: https://localhost/svn/wap/
10.5.8 built-in apache2 參考的 /usr/bin/svn 1.4.4
但 /var/svn 是用 /opt/local/bin/svnadmin 1.6.16 建立出來的
Apr 29 06:10:39 pbg4-17 org.apache.httpd[65275]: httpd: Syntax error on line 485 of /private/etc/apache2/httpd.conf: Syntax error on line 3 of /private/etc/apache2/extra/httpd-subversion.conf: Cannot load /usr/libexec/apache2/mod_dav_svn_1.6.16.so into server: dlopen(/usr/libexec/apache2/mod_dav_svn_1.6.16.so, 10): Library not loaded: /usr/local/lib/libsvn_fs_base-1.0.dylib\n Referenced from: /usr/libexec/apache2/mod_dav_svn_1.6.16.so\n Reason: image not found
就算重build一個 mod_dav_svn_1.6.16.so, 也是沒有辦法
看起來是 apache2 參考到的 /usr/local/lib/libsvn_fs_base-1.0.dylib
沒有辦法打開這個 so
所以目前的方式是重新用 /usrbin/svnadmin 建立 repository
下一步可能考慮重新build apache2 2.2.17 and svn 1.6.16
[Fri Apr 29 06:17:43 2011] [notice] Apache/2.2.17 (Unix) mod_ssl/2.2.17 OpenSSL/0.9.7l DAV/2 SVN/1.4.4 configured -- resuming normal operations
Thursday, April 28, 2011
x11 on mac
1) execute X11.app
2) ssh -X -l remote_username remote_host
After login successfully,
3) export DISPLAY=mac_host:0.0
4) try xclock if displayed on the mac.
2) ssh -X -l remote_username remote_host
After login successfully,
3) export DISPLAY=mac_host:0.0
4) try xclock if displayed on the mac.
Sunday, April 03, 2011
Subscribe to:
Posts (Atom)